Showing posts with label snacks. Show all posts

Monday, April 27, 2015

Recipe: (Non-Alcoholic) Pineapple Mojito Smoothie

0

I'll be honest... I've been going a little smoothie crazy lately. I seem to always crave them as soon as the weather warms up a little bit. I plan on experimenting with different, interesting ingredients and sharing all my smoothie-masterpieces with you guys- starting with this one! It's light and refreshing and perfect for the spring and summer. Plus, it not only makes a great quick addition to your breakfast or snack, it can be turned into an awesome cocktail smoothie by adding some rum

Makes 1 serving
Here's what you'll need:

1 1/2 cups fresh or frozen pineapple
3/4 cup water (use 1 cup if using frozen pineapple)
4 fresh mint leaves
the juice of 1 lime

Blend all ingredients together for about a minute - or until the mint leaves are distributed evenly throughout the smoothie. Sprinkle with a bit of raw cane sugar if you please! Enjoy :)
Read More »

Tuesday, April 7, 2015

Recipe | Morning Glory Green Smoothie

0

Hey friends! Long time, no blog. The past couple of months have been rough... emotionally, psychologically, physically... I have been neglecting to do things that I love and make me truly happy for a number of reasons, and maybe I'll elaborate in a future post, but for now let's just get into this awesome smoothie recipe.

I call it a "morning glory" green smoothie because I like to have it in the morning for breakfast and it gives me the boost of energy that I often need to get my day going. Call it whatever you want, just give it a shot. If you're skeptical about green smoothies, this is a perfect one to ease you into this delicious, healthy trend.

What you'll need (this recipe makes 3 smoothies):
3 apples, roughly chopped
2 bananas, peeled and roughly chopped
3 cups of your favorite leafy greens (I used a mixture of baby spinach, chard, and kale)
2 kiwis, peeled and roughly chopped
the juice of 1 lemon
2 cups water
8-10 ice cubes

Throw all of the ingredients in a blender and blend until smooth. I left the skins on my apples because I don't mind the texture and the skins add more nutrients to the smoothie. Peel the apples if you're not into the little specks of skin throughout your smoothie. Also, I'll sometimes add a tbsp of chia seeds to the smoothie after blending for some extra nutrients and texture.

Enjoy!
Read More »

Tuesday, December 10, 2013

Recipe | Vegan Pumpkin Maple Walnut Scones

0

This recipe was loosely based on this pumpkin scone I found here. I had never made scones before, let alone vegan ones, and needed something to base my measurements off of.

Makes 10 scones.

1 cup raw walnuts
2 cups brown rice flour (or any flour you have on hand, really)
1/4 cup coconut sugar (or brown sugar)
1 tbsp baking powder
1 tsp pumpkin pie spice
1 tsp cinnamon
1/4 cup solid coconut oil
1/2 cup pumpkin puree
1/4 cup pure maple syrup
1/4 cup unsweetened almond milk
1/2 tsp vanilla extract
a pinch of salt

Preheat your oven to 400° Fahrenheit

Spread your walnuts in a single layer on a baking sheet. Toast them for 3-5 minutes in your preheated oven. Remove them and chop them into tiny pieces.


In a large mixing bowl, combine the flour, sugar, cinnamon, pumpkin pie spice, baking powder, and walnuts.


In a separate bowl, mix together the pumpkin puree, maple syrup, almond milk, and vanilla extract.


Cut the solid coconut oil into the flour mixture until it becomes crumbly and lumpy. You can do this with a fork or if you're fancy, with a pastry cutter. The you can introduce the wet ingredients to the dry ingredients.


Mix until the dough starts to come together.


Remove from the bowl and onto a lightly floured clean surface. Form the dough into a about a 1 inch thick circle.


Use a circular cookie cutter, a cup, mug, or some sort of small circular object to cut your scones into rounds. You could also cut them into triangles, but I'm partial to the round scone... I think it's because Ireland really only had round ones when I was there.

Place your scones on a lightly greased, or lined with parchment paper, baking sheet.


Bake for about 12-15 minutes, depending on your oven, or until lightly golden brown.


And there you go! A delicious addition to your morning coffee routine, afternoon snack, or just an anytime treat.

Enjoy! :)
Read More »

Tuesday, November 5, 2013

Recipe | Cinnamon Banana Butter

0


When I buy bananas for myself, there's a very small threshold of time where I can eat them and actually enjoy them. I love slightly green bananas... just under their ideal ripeness. Once the green is gone, so is my appetite for them.

Because of this weird banana preference that I have, I'm often left with 2-3 bananas on hand that are too ripe for my liking. I usually will give them to my mom to make her delicious vegan banana bread, but if I won't be seeing her for a while, I thought up a VERY easy and VERY delicious way to use them up so they're not just sitting around.

Makes about a pint of "butter"

3 ripe bananas, mashed
*my bananas were on the larger side. if your bananas are looking a little skimpy, just add another one.
1/4 tsp vanilla extract
1 tbsp ground cinnamon

Combine all the ingredients in a mixing bowl until they are thoroughly incorporated and the bananas are mashed to a smooth but chunky consistency.

Spread over toast, add to your oatmeal, or just eat it up with a spoon! Transfer any leftovers to an airtight container and store in the fridge for up to a week (if it even lasts that long)

Enjoy! :)
Read More »

Monday, June 10, 2013

Recipe | Vegan Blackberry Jam

0
If you're anything like me, you love a good peanut butter and jelly sandwich... quite frequently. However, buying organic jellies and jams all the time can end up being expensive. Not to mention, a lot of times companies will use gelatin (an animal product) to thicken their jellies and jams. So, a simple solution to these issues: make your own! This recipe is really simple and very easy to customize to your own preferences.


12 oz bag of frozen blackberries (or any frozen fruit, really), thawed
A few tbsp raw sugar (I used about 4 tbsp)
The juice of one orange
The juice of 1/2 a lemon
1 tbsp calcium water
1 tbsp fruit pectin

A couple things that should be explained right off the bat:

1. I think it's standard that all packets of fruit pectin come with a separate packet of monocalcium phosphate to activate the pectin to do its job. Mine did, and that's what the "calcium water" in the ingredient list refers too. My box of pectin called for that to be mixed with water and added to the recipe before the pectin. Just follow the directions on your box and you should be okay.

2. I enjoy a jam that is less sweet and a little bit more runny/not as gelled up. Therefore, I did not add nearly as much sugar as some recipes call for and I added less than the suggested amount of pectin to my fruit mixture. Customize this recipe to cater to your preferences! It's very adjustable.

Combine the bag of thawed, frozen fruit, orange juice, and lemon juice in a sauce pan. Begin mashing up whatever fruit you chose. Mash it to the consistency that you desire. I left mine quite chunky. Bring to a simmer on low heat and dissolve the sugar. Add your pectin according to the directions on your box. You can transfer your fruit mixture to whatever you plan on storing it in, leave the lid off, and put it in the fridge for a few hours to cool off. It will continue thickening as it cools.

If you actually go the length to steralize a mason jar for this, your jam should last for quite some time in the fridge. I'm impatient so I just washed my mason jar really well. I don't expect it to last very long in my fridge because I'll eat it all before it has a chance to go bad.

Enjoy! :)
Read More »

Saturday, May 18, 2013

Recipe | Smokey Avocado and Chickpea Dip

0

1 15 oz can of Chickpeas (garbanzo beans)
1 avocado
1/2 red onion, chopped
2 cloves garlic, chopped
2-3 tbsp extra virgin olive oil
1 tbsp cumin
1 tsp smoked paprika
salt and pepper to taste


Combine all ingredients in a large food processor and pulse until the desired consistency is achieved. My food processor was small so I processed the garbanzo beans, added them to a bowl, then processed the garlic and onion and added that to the bowl, then I just added the avocado straight to the bowl without processing, added the spices and olive oil and mixed everything together with a spoon.

Serve this as a spread on a sandwich or just dip your favorite pita chips in it. I won't judge you if you decide to just eat it with a spoon, though
Read More »

Saturday, March 23, 2013

Recipe | Fruit Salad

0
I just wanted something fresh to have on hand for breakfast or random snacking throughout the day, so I threw this together in about 10 minutes and now have a huge batch ready for me whenever I want it. Again, this is so painfully easy I feel silly writing it out.


2 mangoes, diced
3 kiwis, chopped
a handful of blueberries
a handful of blackberries
the juice of 1 lemon
the juice of 1 orange

Combine and enjoy

Read More »

Recipe | Bruschetta

0

16 oz. container of grape tomatoes, halved
1/2 onion, minced
a couple tbsp fresh basil, cut into ribbons
2 tbsp Extra Virgin Olive Oil
1 tsp crushed red pepper flakes
Salt and pepper to taste

This seems almost to easy too even make a post about, but combine all of the ingredients in a bowl, toss, and enjoy. Serve on toasted baguette, over pasta, in your salad, anything you can think of. I even add diced fresh mozzarella to the recipe sometimes.
Read More »

Saturday, February 23, 2013

Recipe | Pan-Roasted Spiced Chickpeas

0

1 can of Garbanzo Beans (Chickpeas)
a couple tbsp Extra Virgin Olive Oil
1 tbsp cumin
1/2 tsp crushed red pepper flakes
1 tsp smoked paprika
salt and pepper to taste


Set a large skillet to medium heat. Drain, rinse and DRY the chickpeas. DRY THEM REALLY WELL OR THEY WON'T GET AS CRUNCHY. Add them to the hot pan with some oil and coat them well with it. Add the spices to the pan and stir to combine.


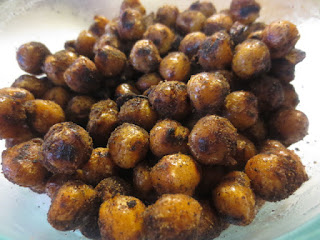
Cook everything together for about 20 minutes, stirring occasionally. Make sure every time you stir them, they end up back in a single layer so that every chickpea is touching the hot pan to get crispy. You might need to add a little more oil throughout the cooking process to avoid sticking. I only had to do this twice and ended up using about 2 tbsp all together. They should achieve color that looks like this after 20 minutes:


Feel free to make them darker if you like, this is just how I preferred them. You can put them over salads, mixed in with rice or pasta dishes at the last minute for that extra crunch, or you could just eat them plain. Enjoy!
Read More »