Showing posts with label soy. Show all posts

Saturday, May 11, 2013

Health Tip | Meat Substitutions

0

It's so easy to be a vegetarian nowadays with the HEAPS of options you have to swap out the meat components with in your favorite dishes.

I consider myself blessed to have been raised by a mother who sleeps, breathes, and (literally) eats organically. She preaches the importance of non-GMO products. Preservatives, carageneen, and pesticide-covered produce immediately spoil when she's around. And don't get me started about her meat industry rants.

She practices what she preaches and these habits have rubbed off on me. I've been a vegetarian for almost two years now and health-wise it was the best decision I've ever made. I live on my own down at school so I try my hardest to live by what my mom taught me when I'm out buying my own groceries and I think I do a pretty good job.

Here's a list of meat substitutes that are either all organic or use non GMO soy. You can start incorporating these into your diets if you're trying to make the transformation to a completely vegetarian lifestyle. All the products listed I've tried and loved. I'm sure there's a bunch more out there which are perfectly delicious that I just haven't tried out yet. GO EXPLORING!

I'll also post the links to the companies' websites (wherever I can) so you can find out if their products are sold in your favorite supermarket.

Disclaimer: not all of these options are VEGAN friendly.


Gardein

Gardein is probably my favorite brand of meatless cuisine. They have SO MANY options to choose from. These are just photos of the ones I or my roommate currently have on hand. Here's a list of all of Gardein's products I've tried:

The Ultimate Beefless Burger
Crispy Chick'n Patty
Lightly Breaded Turk'y Cutlet
Zesty Marinara Crispy Chick'n Filets
Mandarin Orange Crispy Chick'n
Chipotle Lime Crispy Fingers
Seven Grain Crispy Tenders
BBQ Pulled Shreds

Some of these come with little sauce packets, but I usually just toss them and make my own creations (as you can tell with my recipes). The mandarin sauce is really good though if you want a quick meal and don't have the time to make your own elaborate asian-inspired sauce.


Seitan and Tempeh

I don't really have a specific brand that I like to buy when I'm buying seitan or tempeh. For tempeh, it's easy for me to find an organic option in Wegman's or ShopRite or Trader Joe's or wherever I'm buying my groceries. It's not that easy when it comes to seitan... It's a wheat protein and not a soy protein so I cheat a little bit and buy it anyway because Westsoy is the only brand I've seen... but if you can get your hands on an organic brand then absolutely opt for that one.


Lightlife products are relatively new to me, but so far I'm enjoying them quite a bit. They're made with non-GMO soy and they're quite delicious. I was REALLY surprised by their deli options. They're like cold-cuts but totally meat free and tasty. Their Smart Sausages are VERY similar to the Trader Joe's soy sausages that are near and dear to my heart. Definitely an A+ in my book!


Quorn

I'm not sure if it's true for ALL of Quorn's products, but I do know that on the back of the packaging of the ones I've bought in the past, it's stated that the company doesn't use any genetically modified ingredients. Now, the protein that this company used isn't soy or wheat or even vegetable protein. It's called a "mycoprotein" which is similar to that of a fungus, but doesn't taste weird or anything; I happen to really like their products. Here's a list of all the one's I've tried:

Chik'n Patties
Garlic and Herb Chik'n Cutlets
Gruyere Cheese Cutlet
Chik'n Tenders


Trader Joe's


Okay, Trader Joe's is by no means a completely vegetarian grocery store, but they DO have some great meat-free options. ALSO!!!! Their private label guarantees these awesome things:

√ NO artificial flavors or preservatives
√ NO synthetic colors
√ NO MSG
√ NO genetically modified ingredients
√ NO partially hydrogenated oils (artificial trans-fats)
√ NO "marketing" costs

They also offer a BUNCH of organic options. Here's a list of some of my favorite Trader Joe's vegetarian products:

Italian Sausage-less Sausages
Soy Chorizo
Vegetable Masala Burgers
Chicken-less Mandarin Orange Morsels
Organic 3-Grain Tempeh
Organic Vegetarian Baked Beans (I know this isn't really like a meat substitute but I LOVE THESE BEANS)


I've only tried their Falafel Chickpea Balls, but oh my GOD are they good. I'm definitely going to go out and try some of their other products. Although they're not organic, all of their products are completely GMO-free.


I currently don't have any of these products on hand so I don't have any pictures, but my favorite product from this company is the Bombay Veggie Burger. They're GMO-free and just really delicious.


You need to be careful with this company, because some of their products contain GMO soy. However, they DO have some products which state that there are no genetically modified ingredients used, so just read the labels before you buy it.


Well that's all I can think of right now. There are obviously TONS of companies out there that make fantastic vegetarian meals and things of that sort, but this is just a list of specific MEAT substitutes that you can incorporate into your own meals. I hope this helps any budding vegetarians. Just be smart when you're shopping for groceries - do your research and read the labels. 

Read More »

Monday, April 29, 2013

Recipe | Vegan Veggie Melt with Crispy Tempeh

0

This recipe will yield one sandwich for a super hungry person who hasn't eaten in about 8 hours :)

about 1/3 of a baguette - you can use whatever bread you like, this is just what I had on hand. If the baguette is HUGE then just use 1/4 or whatever looks like a decent size for a sandwich for you.
4 oz tempeh (1/2 of an 8 oz. package is usually 1 serving) cut into slices
A couple tbsp extra virgin olive oil
1/2 bell pepper, sliced
1/4 onion, sliced
1 tomato, sliced
1/2 avocado, mashed
2 oz soy mozzarella, sliced
1 tbsp or so of your favorite hot sauce
Salt and pepper to taste

I used a toaster oven to melt the cheese, but you can go ahead and use a regular oven. Set it to 450°F before you start cooking.

Set a skillet to medium heat with some extra virgin olive oil. Begin browning off the slices of tempeh on both sides - about 3-5 minutes on each side.


When they're done browning, take them out of the pan and begin sweating the onions and peppers. Add some salt and pepper and cook them down for about 5-7 minutes.


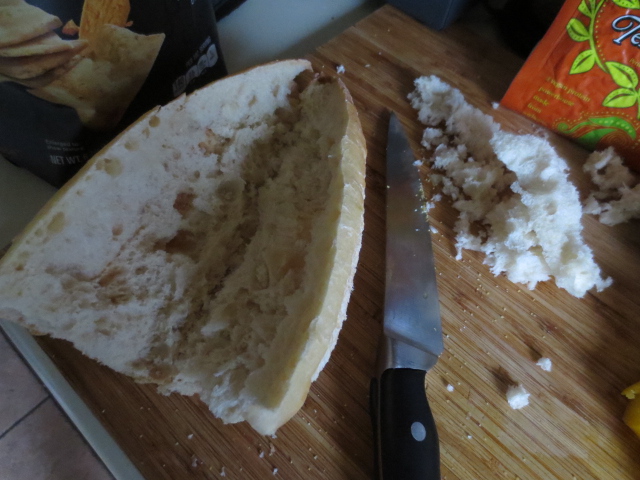
While the peppers and onions are cooking, you can get started on preparing the bread part  of your sandwich. You're gonna want to cut the loaf in half, but don't bring the knife all the way through to the other side. You want one side still intact so your filling doesn't fall all over the place when you're eating it later. Then just gut out the bread-y part so you can fit alllllllll the fillings inside. My bread was a little stale so I just popped it in the toaster oven after I did this to toast it up a bit. If your bread is fresh, this toasting step isn't necessary unless you want it extra crispy.


When your peppers and onions are done cooking, you can start assembling your sandwich. Try not to drool all over it while you're doing this though. Especially if you have guests... I found this part especially difficult to avoid.

You don't have to assemble yours like I did. I'LL NEVER KNOW. I just found this way was best to keep everything all nice and glued together once the sandwich is finished.

Start off with the peppers and onions on one side of the sandwich and the mashed avocado on the other side.


Then, go ahead and add the strips of tempeh to the peppers and onions side, and the slices of tomato to the avocado side.


Top off the tempeh, peppers, and onions with your soy mozzarella.


Sprinkle the whole thing with some salt and pepper. Toast it up in the toaster oven, or an actual oven, for like 5-10 minutes... however long it takes for the cheese to start melting and the bread to crisp up. Top it off with your favorite hot sauce and enjoy!


Read More »

Wednesday, April 17, 2013

Recipe | Vegetable Stir Fry with Chili, Garlic, Ginger Sauce

1

Makes 4 servings

a couple tbsp Extra Virgin Olive Oil
2 1/2 cups water (optional)
1 cup brown rice (optional)
1 package of fake chicken pieces (I used the Gardein brand, you could use anything, really - tofu, seitan, even a couple sliced up veggie burgers if you wanted)
1 onion, sliced
2 bell peppers, sliced
3-4 carrots, julienned (I only had baby carrots, so you're looking for about a cup of chopped carrots)
3 handfuls of saute greens (my mix had baby spinach, baby kale, and baby swiss chard)
1 zucchini, cut in half and then sliced
1 cup frozen broccoli
1 cup frozen or canned corn
1/3 cup reduced sodium soy sauce
1/3 cup hoisin sauce
3 tbsp raw agave
1 tsp chili garlic sauce (you can find this in the ethnic food section of your grocery store)
1 inch of fresh ginger, grated
1 tsp crushed red pepper flakes
Salt and pepper to taste

FOR THE SAUCE:

Make this before you start cooking everything so the flavors have enough time to love each other and develop into a delicious sauce

Combine the soy sauce, hoisin sauce, chili garlic sauce, ginger, and agave in a bowl. Whisk to combine everything and set aside. The reduced sodium soy sauce is important because you don't want your dish to turn out too salty - you should be able to control the amount of salt that goes into your cooking.

FOR THE STIR FRY:

I served mine over rice, so if you plan on doing this as well, and your rice isn't quick-cooking, start on that before you cook the veggies. For long-grain brown rice it's typically 2 1/2 cups of water brought to a boil. Add 1 cup of rice to the boiling water, cover the bot, and reduce the heat to a simmer. Cook for about 35-40 minutes.

Side note: You want all of your veggies to be roughly the same size, so what I did was after I sliced the carrots and peppers, I cut those slices in half, like so:


The onions and zucchini aren't that important because they get very pliable when they're cooked so bigger pieces don't usually pose as an issue.

While your rice is cooking, set a large skillet to medium heat with some extra virgin olive oil. Start browning off your pieces of fake chicken. This should take around 3-5 minutes on each side.


Once your protein is done browning on both sides, start cooking the carrots. Cook them first for a few minutes because they will take the longest to soften up. After about 3 or so minutes have passed, add the peppers and onions. Cook for another 5-7 minutes. Add salt and pepper.


Once the carrots, onions, and peppers start softening up, add the zucchini and cook for another 3-5 minutes. Add a little more salt and pepper but refrain from salting the dish again until the end of the cooking process.


Now you can add the frozen broccoli, corn, red pepper flakes, and the sauce you made earlier. Cover the pan and let everything simmer for another 5-7 minutes. Uncover and add the greens. Turn the heat off and work them in until they're all wilted down. The sauce probably adds enough salt for the remainder of the dish, but adjust any seasonings to your taste.

Serve over rice, lo mein/rice noodles, or just enjoy on its own!
Read More »

Friday, February 22, 2013

Recipe | Vegetable Lo Mein

0

I made this dish for Chris and I one of the nights he came to visit for Valentine's Day last weekend, but I didn't get a chance to write it up until now because I've been swamped with schoolwork. It yielded it about 3 servings total. Here we go:

1 9oz packet of Chinese/Lo Mein style noodles
1 package of Gardein Mandarin Crispy Chik'n
1 carrot, julienned
1 bell pepper, thinly sliced
1 onion, thinly sliced
Handful of Baby Bella Mushrooms, sliced
1 cup Frozen Broccoli pieces (if you're using fresh broccoli, you could just use a small head)
1/2 cup vegetable stock
1/4 cup soy sauce (preferably low sodium)
1/4 cup Hoi Sin sauce
2 tbsp Raw Blue Agave
2 tbsp Extra Virgin Olive Oil
Salt and pepper to taste

Set a large skillet to medium heat. Add the chik'n pieces and 1 tbsp of olive oil to the pan and start browning on both sides. This should take about 5 minutes on each side. While you're waiting for the chik'n pieces to cook, set a pot of water up to boil for the noodles. When the pieces are nice and brown, remove them from the pan and set aside.


The carrots will take the longest to cook up out of the veggies, so start cooking them in the Extra Virgin Olive Oil first. *Side note: to julienne something simply means to cut them into thin strips... like matchstick size and shape. Add a little bit of salt to the carrots, and after about 7 minutes or so they will begin to soften. Next, add the peppers and onions.


 Sautee for about 5 minutes until they begin to soften as well, and then add the mushrooms and broccoli. If you're using fresh broccoli, you might want to blanch the broccoli first because throwing raw broccoli into the dish will take longer to cook. Either that or you could just throw it in with the pepper and onions with a little bit of water, cover with a lid, and steam it for a few minutes before adding the mushrooms. Combine everything and cook together for about 5 minutes.

While the vegetables are all getting nice and cuddly with each other, mix the vegetable stock, soy sauce, hoi sin sauce, and agave in a separate bowl.


You're going to also want to cut up the chik'n pieces into smaller strips, so you can do that at this point too. Add the sauce mixture to the pan with the chik'n pieces, cover, and set the heat to simmer.


At this point you can add the noodles to the boiling water. It's important to read the cooking directions on the back of the package because they do not cook as long as regular pasta! Mine only took 3 minutes


When they're done cooking, add them to the pan, stir to combine, and enjoy! If you have some sesame seeds, you could toast them up in a dry pan and top the lo mein with them.

*** Refrain from salting after the carrots until the very end of the cooking. The soy sauce could be just enough salt for the dish. I didn't need to add any more salt when I made this, but it's all personal preference, so make sure you taste the finished product before you add more salt. ***
Read More »

Saturday, February 9, 2013

Recipe | Protein Packed Brunch for Two

0
Before I went off to college, I used to cook for my mom, sister, and I all the time. My mom's a great cook, but I know she misses my cooking... so it was no surprise that when I mentioned I was going to make some eggs for myself for a little late breakfast, early lunch, she sneakily asked "Oh are you going to make some for me too?"

She couldn't pick up her co-op delivery of fruits and veggies today because of the snowstorm last night, so I just threw whatever was in her fridge that I thought might go well together. I also tried sneaking in a ton of protein to show my mom the amount she really should be getting in each meal. 


Me and my mom finished the whole skillet because it was the only thing we planned on eating for lunch. If you're pairing it with toast, or waffles or pancakes or something else, you could stretch it to be like 3 or four servings.

The whole recipe is 60-65g of protein (I didn't take the time to figure out how much vegetable protein was in it... so this really is just counting the protein from the eggs, soy sausages, and black beans. So me and my mom both had around 30g which is more than enough for one meal. Obviously if you're splitting it up between more people, then you would be consuming less protein, so it's important to make the difference up in other food sources served with this or by doubling the recipe to accommodate more people. 

Here's what you'll need:

1/2 onion, sliced
1/2 bell pepper, sliced
1 tbsp Extra Virgin Olive Oil
1 cup of grape or cherry tomatoes, halved
2 soy sausages, halved lengthwise and then cut into half-moons
1 cup black beans, drained and rinsed
1/4 cup miso ginger vinaigrette
3 eggs, whisked
Salt and Pepper to taste

As always, start off by sauteing the peppers and onions in the olive oil until they begin to brown.


Once they start to get some color (after about 5-7 minutes or so), add the cherry or grape tomato halves to the pan. Start blistering the tomatoes. Don't worry if they start breaking up, that's what you want to happen.


When the tomatoes start to blister and break down (about 5 more minutes or so), add the sausages. Refrain from salting everything until the very end. The vinaigrette that you'll be adding might be enough seasoning for some people and you don't want your dish to be too salty.


Let all the flavors mix together before adding the black beans and miso ginger vinaigrette. I used Wegman's brand of vinaigrette. If you can't find a miso ginger one, a sesame or sesame ginger or even a plain Italian would be a good substitute. If you're in a pinch and you don't have ANY vinaigrette to add, just add the juice of half a lemon and some Italian seasoning... that should be pretty tasty. Or just skip it all together... I'm never gonna find out!


Finally, after you've incorporated the beans and vinaigrette (or just the beans), add in the eggs and scramble to your desired consistency. The ratio is going to look like 5:1 eggs to veg/sausage/beans which, in my opinion, is better than having mostly eggs filling up your plate. Enjoy!
Read More »

Wednesday, February 6, 2013

Recipe | Farfalle with Baby Bellas, Peppers, and Onions and a Sun-dried Tomato and Rosemary Sauce

0
There are no pictures for this one because I just threw it together at the last minute... like about a half hour ago because I was starving when I got home from class. But it looks fancy as ~heLl and tastes equally as delicious.

I purposely made this yield two servings because I want to bring it with me to campus for lunch tomorrow, so here ya go:

1 tbsp Extra Virgin Olive Oil
2 cloves garlic, minced
2 cups Farfalle pasta
1/2 onion, sliced
1/2 bell pepper, sliced (use whatever color... I used green because I had a half left over from my breakfast this morning)
A handful of Baby Bella mushrooms, sliced (roughly anywhere from 5-8 depending on their size)
1 soy sausage, cut in half lengthwise, and then sliced into half-mood shapes (I used Trader Joe's brand, but Smart Sausages are equally as delicious)
1/4 cup julliened sun-dried tomatoes (with the olive oil)
1 tbsp fresh rosemary
3/4 cup vegetable stock
a few leaves of basil, roughly chopped
1 tsp crushed red pepper flakes
Salt and pepper to taste

Fill a large pot with water and set it on high. When the water comes up to a boil, add a generous amount of salt along with the two cups of Farfalle.

While waiting for the water to boil, coat a medium sized skillet with the olive oil and sautee the garlic, peppers, and onions. When they begin to soften up (after about 5 minutes), add the mushrooms to the pan. Sautee the vegetables for another 5 minutes or so. Season with salt and pepper before moving on to the next step

When all the vegetables are nice and sauteed, add the sausage pieces, sun-dried tomatoes, and fresh rosemary. You could brown up the sausage before you sautee the vegetables and then chop it up and add it in at the end, but I forgot to do that, so I just added them in with the other ingredients after the vegetables were cooked. Combine everything and season again with salt and pepper.

Add the vegetable stock and crushed red pepper flakes to the pan and simmer until the pasta is finished cooking. Before draining the pasta, add about 1/4 of a cup of the starchy pasta water to the pan to give a little more body. Drain the pasta, combine it with the sauce either in the pan if there's room, in the pot that you cooked the pasta in, or in a separate bowl. Toss together with the fresh basil and check to make sure the seasonings are okay.

You could serve this with some Parmesan or some fresh Mozzarella on top.
Read More »

Sunday, January 27, 2013

Recipe | Vegetarian Chili with Soy Chorizo and Tri-Colored Quinoa

0

This is what I had for dinner tonight. No pre-planning, it was just a last minute dinner idea that turned into a god damn masterpiece (Rachel's reactions to it when she got home from work were enough proof) It should yield about 4 servings and it's VERY filling and hearty.

1 large onion, chopped
1 bell pepper (whichever color you prefer, I used red), chopped
1 package of Soy Chorizo
1 cup Quinoa
3 cups water
1 cup Tomato and Roasted Red Pepper soup
1 can of Black Beans, drained and rinsed
1 tbsp Sriracha Hot Sauce
1 tsp Cumin
1/2 tsp Cinnamon
1 tsp Smoked Paprika
1 tbsp Extra Virgin Olive Oil
Salt and Pepper to taste

Start off by heating up a large saucepan or pot with the olive oil to medium heat. Saute the peppers and onions until they soften up. They don't have to be browned or anything, so salt and pepper them and just sweat them out for about 5-7 minutes.


Once the peppers and onions begin to soften up, add the soy chorizo. Make sure you remove the chorizo from the plastic casing within the plastic packaging before you add it to the pan! Also, I don't know if there's any other brand out there that makes soy chorizo besides Trader Joe's. If you can't get a hold of soy chorizo you can just use soy crumbles and season it up like chorizo (google it, guys. I already threw out the packaging).


While the peppers, onions, and soy chorizo are cooking together, you can start cooking the quinoa. Check your packaging, but usually the cooking method for quinoa is 1 part quinoa to 2 parts water. So for this recipe, combine 1 cup of the tri-colored quinoa (or whatever quinoa you prefer... cooking methods may vary) with 2 cups of water in a pot and bring it up to a boil. Once the water's boiling, cover the pot and bring it down to a simmer for 10-12 minutes, or until the water is absorbed and the quinoa is tender. For more flavor, you can substitute veg stock for the water.


While the quinoa is simmering, add the cup of water, cup of roasted red pepper and tomato soup, black beans, sriracha, cumin, cinnamon, and smoked paprika to the pan. Stir to incorporate all the flavors, cover, and simmer until the quinoa is finished. After the quinoa is done, add it to the pan and stir once again to combine all the flavors.


If you can't get a hold of a decent roasted red pepper and tomato soup, using a can of fire roasted chopped tomatoes would be reeeeeally delicious in this. I was actually planning on using that but I didn't have a can on hand to use. Also, to stretch this recipe you could double or even triple the amount of beans in it, making it a 2 or 3 type bean chili by adding kidney and/ or cannelini beans or your favorite type to the recipe. Also, feel free to add as much or as little hot sauce to the recipe depending on your ability to handle spicy foods.

I'm probably gonna mix some of the leftovers with eggs tomorrow for breakfast.
Read More »

Saturday, January 19, 2013

Recipe | Soy Sausages with Sauteed Onions and Swiss Chard over Thai Coconut Rice

0
So yes, I actually measured everything out for this recipe (I know, it's quite shocking) so I could share it with whoever might be interested in trying it out. Here it goes!

This recipe yielded a comfortable 2 servings for my mom and I with some left over rice. You could easily double the recipe to feed more people or just incorporate some other side dishes with it.


So for the rice... it's the easiest thing ever. I made mine in a rice cooker but it's just as easy on the stove top. you'll need:
2 cups Basmati Rice
3 cups water or vegetable stock
1-2 tbsp of Coconut Thai Seasoning (depending on how spicy you want it... I used 2 tbsp and it had a little kick to it)
1 tbsp Extra Virgin Olive Oil
Salt and pepper to taste

For reference, this is what the coconut thai seasoning that I used looks like. You could probably find something similar to it in the ethnic food section of your local supermarket.


If  you're cooking the rice in a rice cooker, it's quite simple. just combine the rice, water or veg stock, and the coconut thai blend in the cooker and turn it on. When it's finished cooking, fluff the rice with a fork and add however much salt and pepper you desire. Add the oil and mix everything together.

If you're cooking the rice on the stovetop, combine the rice, water or veg stock, and the coconut thai blend in a pot and bring to a boil. Once it's boiling, put the heat down to simmer and cover the pot. Cook until all the liquids have been absorbed and the rice is tender (usually about 15-20 minutes)


While the rice is cooking, you can work on the soy sausages with sauteed onions and Swiss chard. For this portion of the recipe, you'll need:

1 onion, sliced
2 soy sausages, cut in half, and then cut in half again, length-wise (this should give you 8 pieces total)
5-8 stalks of Swiss chard (depending on how big they are), roughly chopped
1 tsp turmeric
1 tsp garlic powder
1/2 tsp lemon pepper
1 tbsp Extra Virgin Olive Oil
Salt and pepper to taste

Set a large skillet over medium heat and add the oil. Once the pan is up to temperature, start browning the pieces of soy sausages. You can use any brand, but I recommend either Trader Joe's or the Smart brand of meatless sausages. They just taste the best in my opinion. For this recipe, I used Trader Joe's Italian Style Soy Sausages


Saute the sausages for about 2-3 minutes on each side, or until golden brown.


When you're done sauteing the sausages, remove them from the pan and add the onions. Saute the onions for about 5-7 minutes, or until they begin to get some color and soften up. It's important to hold off on salting them so they can caramelize a little bit and develop some nice color.


At this point you're ready to tackle the Swiss chard. If you've never worked with Swiss chard before, it's so painfully easy. All you do it pull the leafy green parts off of the white stalks and chop it up. If you think you've chopped up too much, YOU DIDN'T! Swiss chard is just like spinach and will reeeeeeally wilt down to almost nothing... so your 5-8 stalks of greens turn into about 1/2-1 cup soon after it hits the pan. I used enough to fill up a colander when I washed it (mainly because that's all that was left in the fridge)


Swiss chard doesn't take long to cook at all. Introduce the greens to the pan with the onions and stir around until the greens begin to wilt. This should take around 2-3 minutes. Once the greens begin wilting, add the turmeric, garlic powder, lemon pepper, and salt and pepper to taste.


Stir to incorporate all the seasonings, and then throw the sausages back into the pan and combine all the flavors together and finish wilting the Swiss chard.


Serve over the coconut thai seasoned rice or right along side of it and enjoy!

By the way, the green beans in the picture were simply steamed and seasoned with salt and pepper... really nothing special at all, but still delicious.
Read More »